This second part of our Medical Laboratory Project Management Series focuses on the Critical Path Method. For an overview of different project management methods, please see our blog that discusses Project Management Overview.
Critical Path Method Explained
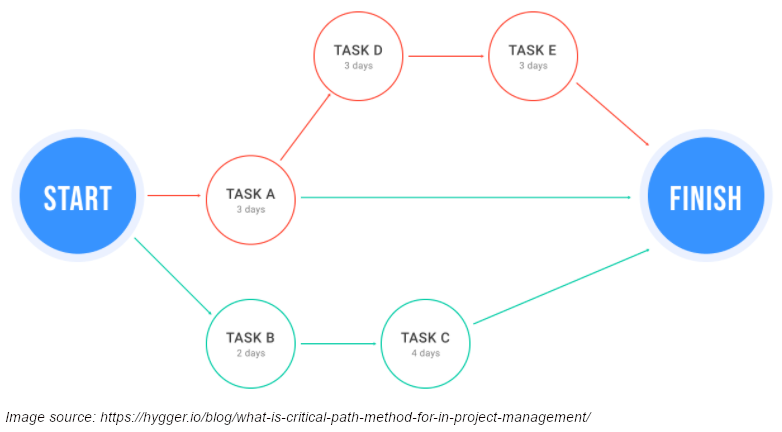
The critical path method is best used on mid-size projects. It provides a way to analyze a project and determine the critical steps needed to complete the project in the shortest possible length of time. It also acts as a tool to schedule the project so that it is completed in a timely manner and at the lowest possible cost. Important characteristics that lend a project to the critical path method include a well-defined collection of jobs that can be stopped and started independently of each other.
Critical Path Method Example: Instrument Validation
The following section will explain how the critical path method can be applied to instrument validation. When validating an instrument there are several steps, including building test, training technologists, gathering materials/supplies, preparing any samples required for the validation, actually validating the instrument, interfacing the instrument, and completing the validation report. These steps can take place simultaneously or combined into one step. For example, while setting up supplies, preparing samples, training and validation the IT department can be building the test in the LIS. Another example of combining two steps into one would be using the samples the technologists prepare in their training as validation samples.
Conversely, steps like interfacing the instrument can’t happen until after the test is built and validation occurs. Also, writing the validation report cannot occur until the instrument is validated.
Sequence and Time Requirements of the job
The first thing to do when setting up a project using the critical path is to establish the sequence of tasks and assign time requirements for each step. The best way to do this is to set up a table with each step listed, where each step is assigned a character, immediate predecessor, and time frame.
| Job Number | Description | Immediate Predecessor | Normal Time (# days) |
| A | Start | N/A | 0 |
| B | Build Test | Can occur concurrently with steps C-I | 3 |
| C | Train Technologists | A | 1 |
| D | Gather Materials | C | 1 |
| E | Prepare Samples | D | 1 |
| F | Validate Instrument | E | 2 |
| G | Interface Instrument | F | 1 |
| H | Validation Report | G | 1 |
| I | Finish | H | 0 |
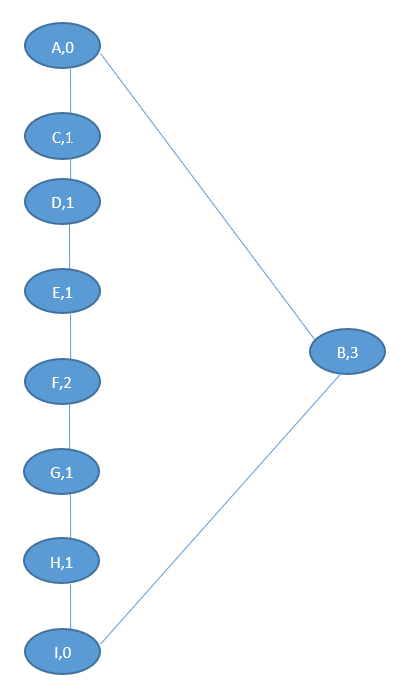
Once the tasks and the time requirements are figured out for the project it is helpful to lay them out in a flow chart. This helps to visualize which steps can be shortened, combined, worked simultaneously, or eliminated altogether.
Shortening CP
Examining the graph is a crucial step in evaluating the critical path. It allows the laboratory manager to understand where to best use their resources. For example, are there any tasks that would happen faster if more people were allocated to them? Furthermore, can the lab afford to allocate people with staffing in the field being short? If the lab can’t allocate more staff, is overtime an option? Or are any of these things really needed?
Looking at our above example, this is a very straightforward and simple validation. All samples can be run in one shift and test time is relatively short. Looking at the graph, the manager sees that training technologists can be combined with validation, which will eliminate a day. The samples that the technologists use for practice can be used as part of the validation. If the techs need any extra practice, any subsequent samples can also be used in the validation.
Looking at this graph, the most time-consuming test is building the test in LIS. This task can be performed in parallel to all the other steps in the process, so it is not really a limiting factor. Steps that should be of concern are steps F (validation), G (interfacing), and H (validation report). These steps are where problems can occur and the steps that will use the most amount of resources.
Critical Path Algorithm
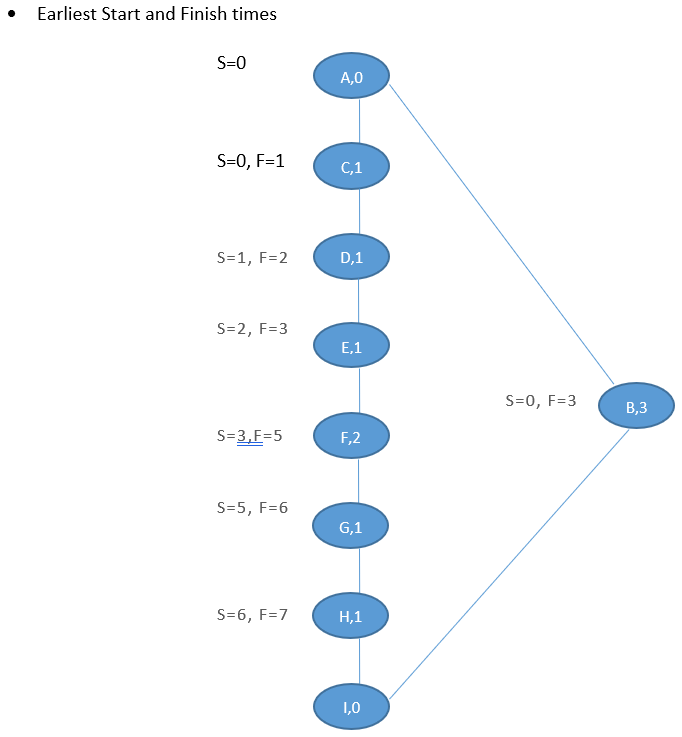
The critical path algorithm refers to establishing the earliest possible start times for each step and the latest possible finishing times for each step in order for the project to be completed on time. Below is an example of finding the earliest possible start time. Remember the number to the right of the comma is the time to completion measured in days. Next to each step the earliest start time and the earliest finish time are listed. Start time is determined by the finishing time from the previous step and finish time is determined by adding the amount of time needed to complete a step to the start time. Looking at step D the start time is day 1 because the finishing time for step C is day 1. The length of time to complete step D is one day so adding that to the start time would give you a finish time of day 2.
- Latest Start and Finish times
Latest start and finish times are more apparent in larger projects with multiple parallel steps. The best example to illustrate this concept in our project is step B. This entire project should take seven (7) days in total. Step B is completely independent of all the other steps and takes three (3) days to complete. Therefore, the latest that this step can be started for the project to get done on time is on day four (4) of the project.
Finding the Critical Path
The critical path is the path of the project that includes critical jobs only. This is the path in which all steps must be completed exactly on time in order for the project to get done on time. There is no room for error. In this example, it’s obvious that the critical path is the path that includes steps A, C, D, E, F, G, H, and I. These steps directly affect project time.
Significance of Slack
Slack is what is coequally referred to as “wiggle room.” This accounts for delays and errors that may occur during a project. There are two types of slack. The first kind is total slack. Total slack is defined as the maximum amount of time the project can be delayed beyond its early start time and still be done at the deadline. Free slack is the amount of time that specific jobs can be delayed within the project without delaying the entire project. In our example, if step B is started after day four (4), the whole project will be delayed.
Handling Errors
Every project will have errors and it’s important that when they happen they are dealt with in a timely manner. This is a natural process and the lab manager shouldn’t panic when errors occur. When validating an instrument several things can happen. Samples may not give anticipated results, interfacing the instrument may not go as expected, and training the techs may take longer than anticipated. Furthermore, steps may be overlooked in the process and predecessor relationships may be overlooked.
How should management deal with these problems?
- Give rough estimates of timelines. This gives management leeway when the project doesn’t go exactly as planned.
- Continuously check that all jobs on the critical path are running on schedule and re-evaluate the project if needed.
- Use specialized computer program to check for errors in the critical path.
Cost Concerns
As with every project, there are cost considerations. Instrument validations are already expensive because essentially the lab is running numerous tests to prove that the machine works correctly with no revenue being generated. When the lab runs a validation it eats the cost. This means that whatever new instrument is being brought in it needs to add value either in savings or new revenue.
Getting the project done faster and before the deadline is great because that means the project is producing results sooner. However, getting the project done faster means that you have to put more resources toward the project. In the case of instrument validation, this may mean pulling a tech away from the bench causing the other techs to pick up the slack. In an already short-staffed lab, this almost guarantees that overtime will have to be paid. The cost of overtime would need to be offset by the cost savings/added revenue that the new project will bring into the lab.
Planning out instrument validation using the critical path method can be useful in evaluating these needs and concerns. Combining steps in the critical path can help offset costs in one area of the project so that more resources can be added to another. Analyzing the critical path chart can also help a manager to see steps that have too many resources and slim these areas down.